|
Tutorials, questions, demos, questionable images ,,,
Moderator: Moderators
Forum rules
Please ensure that you have a meaningful location included in your profile. Please refer to the FAQ for details of what "meaningful" is.
 by NikonUser on Wed May 17, 2006 7:53 pm by NikonUser on Wed May 17, 2006 7:53 pm
Hi there,
I just learnt this technique on the "Photoshop TV' podcast and thought it was a great little trick to help make colours pop in some images. I thought I'd share it with others. I hope this post doesn't break any rules... if so please feel free to remove it.
First... Here is a before and after shot to demonstrate what this technique does:

Now to how it's done:
1) First open up your image in Photoshop
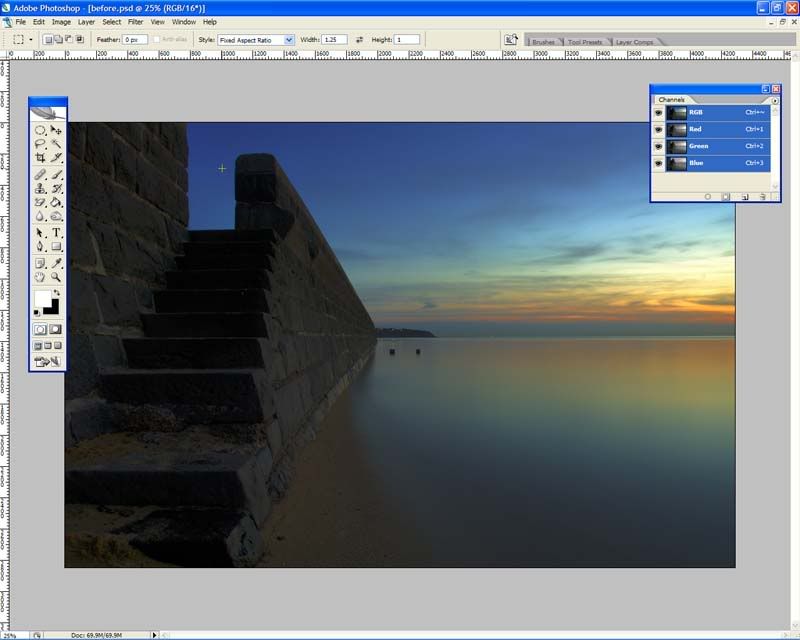
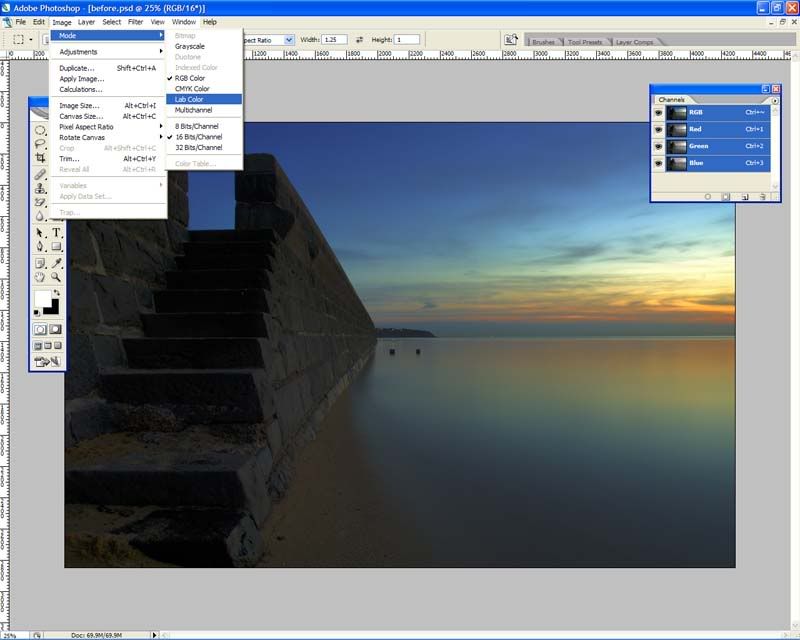
2) Next you need to convert your image into LAB colour mode.
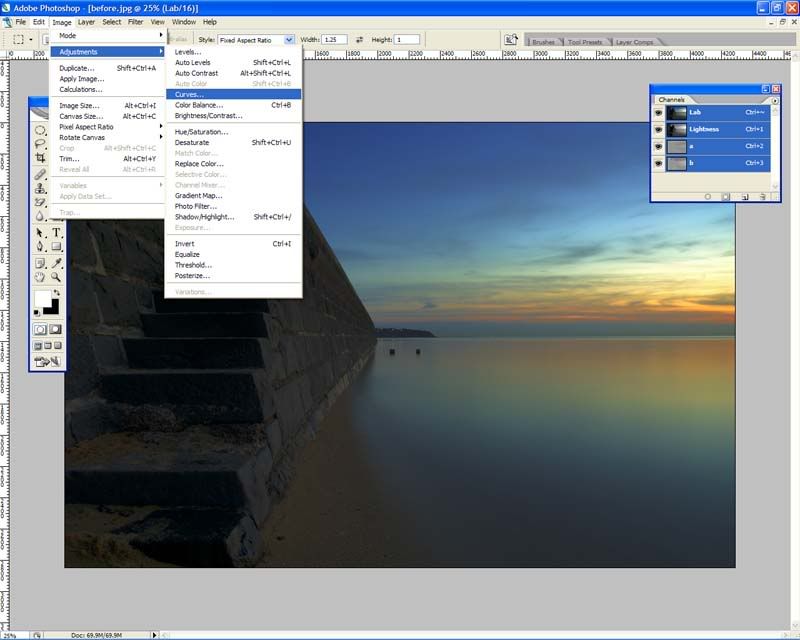
3) Now you need to open the curves dialouge box:
4) First you need to choose to adjust only the "a" channel.
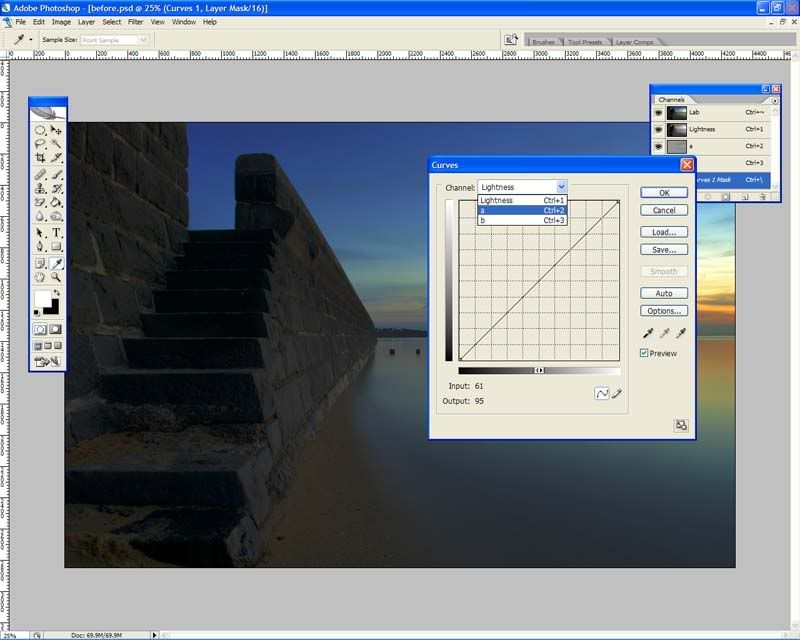
5) Now move the sliders as shown below. If you have large grid squares instead of small ones as shows hold down the "alt" key and click anywhere in the grid.
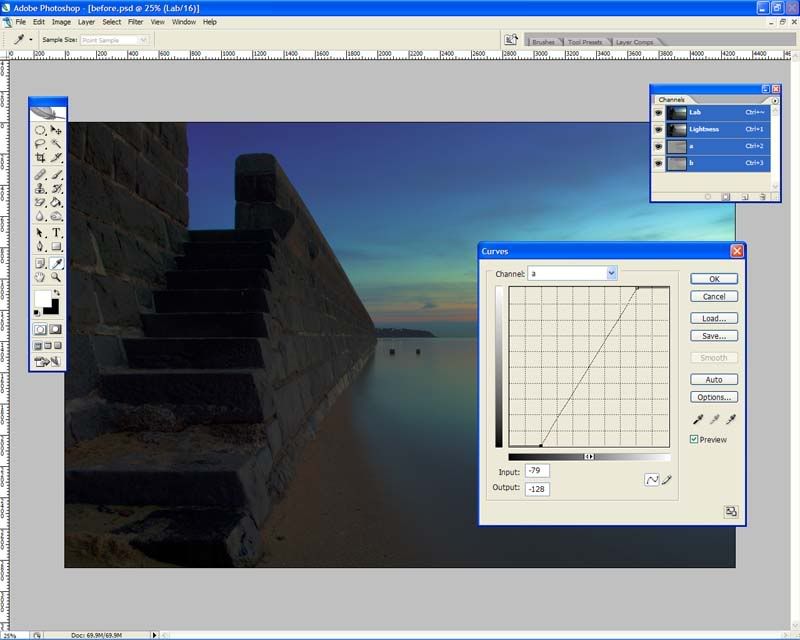
6) Don't press the 'OK' button just yet. Now you need to adjust the 'b' channel in exactly the same way:
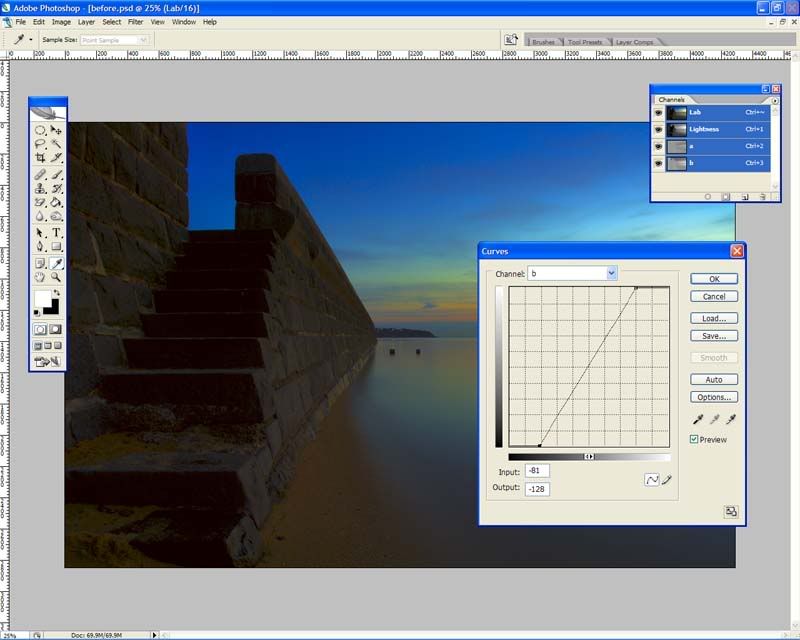
7) Now click on 'OK'. Most of the time this effect is too strong so you will need to 'fade' it a little. Since it's not a layer you will need to use the 'fade' command under the edit menu
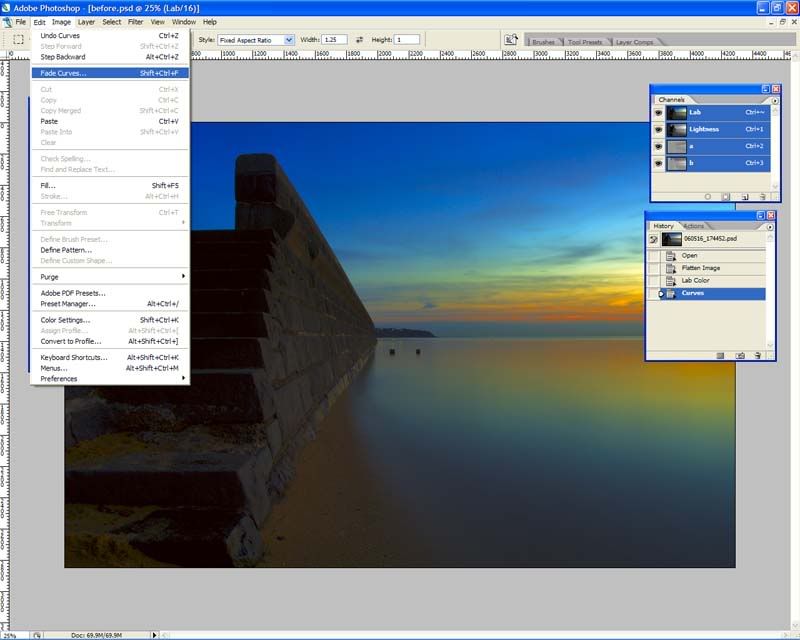
 Fade it to whatever suits your taste/image
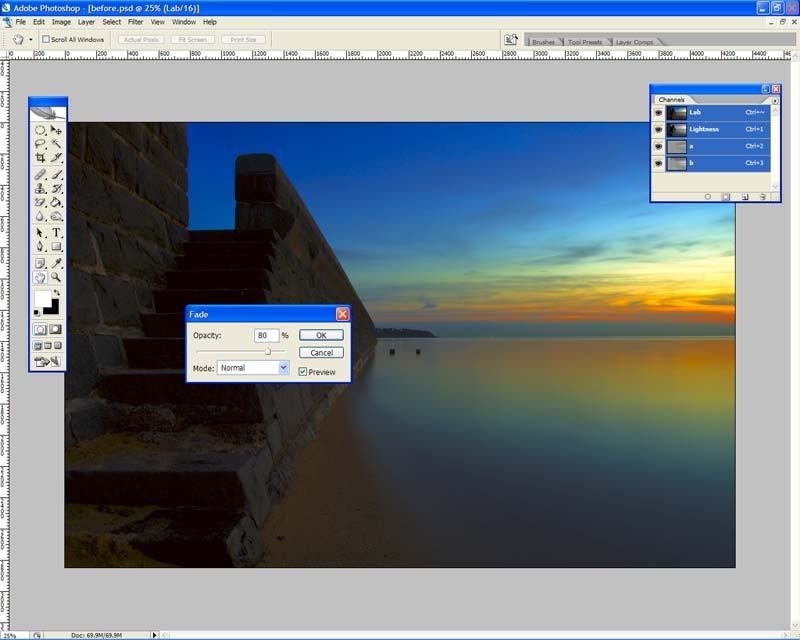
And that's it!!
Hope you guys like it (and that I've posted it correctly!!)
Would be interested to see before/after images using this.
Paul
-

NikonUser
- Senior Member
-
- Posts: 1064
- Joined: Tue Jul 12, 2005 6:18 pm
- Location: Canberra - **D2X**
-
 by nito on Wed May 17, 2006 8:40 pm by nito on Wed May 17, 2006 8:40 pm
nice tips. Thanks 
-
nito
- Senior Member
-
- Posts: 1109
- Joined: Sat May 14, 2005 11:24 am
- Location: Gladesville, NSW
 by marcotrov on Wed May 17, 2006 8:49 pm by marcotrov on Wed May 17, 2006 8:49 pm
It proves there is always more than one way to skin a cat  Thanks for the explanation Paul. 
cheers
marco
-
marcotrov
- Senior Member
-
- Posts: 2577
- Joined: Mon Feb 28, 2005 2:21 pm
- Location: Cairns, Queensland, Australia
 by NikonUser on Wed May 17, 2006 8:57 pm by NikonUser on Wed May 17, 2006 8:57 pm
marcotrov wrote:It proves there is always more than one way to skin a cat  Thanks for the explanation Paul.  cheers marco
How else would you achieve this? I tried with the levels, curves and saturation tools in RGB but couldn't get anything that would look nearly as 'smooth' (for want of a better word) as this.
Interested to see if the same effect can be done in other (less involved) ways!
EDIT: Also... is there anyone who can explain to me what is happening in the adjustment of the 'a' and 'b' channels? Seems to work ok but I have no idea what it actually is doing to the image
Paul Last edited by NikonUser on Wed May 17, 2006 8:59 pm, edited 1 time in total.
-

NikonUser
- Senior Member
-
- Posts: 1064
- Joined: Tue Jul 12, 2005 6:18 pm
- Location: Canberra - **D2X**
-
 by Alex on Wed May 17, 2006 8:58 pm by Alex on Wed May 17, 2006 8:58 pm
Yes, lab mode gives much greater flexibility than RGB in many cases. You can also play with the L curve to give it more POP.
Alex
-

Alex
- Senior Member
-
- Posts: 3465
- Joined: Thu Feb 24, 2005 6:14 pm
- Location: Melbourne - Nikon
-
 by blinkblink on Wed May 17, 2006 9:10 pm by blinkblink on Wed May 17, 2006 9:10 pm
Excellent post. Thanks. More like these please.
-

blinkblink
- Member
-
- Posts: 479
- Joined: Thu Sep 15, 2005 6:55 pm
- Location: Romsey, Victoria
 by huynhie on Wed May 17, 2006 9:19 pm by huynhie on Wed May 17, 2006 9:19 pm
Cool,
looking forward to trying it out.
-

huynhie
- Senior Member
-
- Posts: 1476
- Joined: Wed Jan 19, 2005 12:11 pm
- Location: Sydney
 by ABG on Wed May 17, 2006 9:22 pm by ABG on Wed May 17, 2006 9:22 pm
Great tutorial Paul. Thanks for sharing.
Andrew
-

ABG
- Senior Member
-
- Posts: 689
- Joined: Mon Nov 14, 2005 1:53 pm
- Location: Oatley, Sydney
-
 by birddog114 on Wed May 17, 2006 9:27 pm by birddog114 on Wed May 17, 2006 9:27 pm
Do we still need the workshop if this rate of tutorial going up high?
Birddog114
VNAF, My Beloved Country and Airspace
-

birddog114
- Senior Member
-
- Posts: 15881
- Joined: Sat Aug 07, 2004 8:18 pm
- Location: Belmore,Sydney
 by TonyH on Wed May 17, 2006 9:27 pm by TonyH on Wed May 17, 2006 9:27 pm
Very good tute Paul...... Thanks!
All I know, is that I don't know enough.....
-
TonyH
- Senior Member
-
- Posts: 856
- Joined: Wed Aug 17, 2005 7:39 am
- Location: Brisbane, QLD Nikon D200 & D70
 by gstark on Wed May 17, 2006 9:30 pm by gstark on Wed May 17, 2006 9:30 pm
birddog114 wrote:Do we still need the workshop if this rate of tutorial going up high?
I would say yes.
There is nothing that can equal a hands on session, especially with somebidy as good as Matt K leading the troops. g.
Gary Stark
Nikon, Canon, Bronica .... stuff
The people who want English to be the official language of the United States are uncomfortable with their leaders being fluent in it - US Pres. Bartlet
-

gstark
- Site Admin
-
- Posts: 22926
- Joined: Thu Aug 05, 2004 11:41 pm
- Location: Bondi, NSW
 by phillipb on Wed May 17, 2006 9:32 pm by phillipb on Wed May 17, 2006 9:32 pm
Thanks Paul,
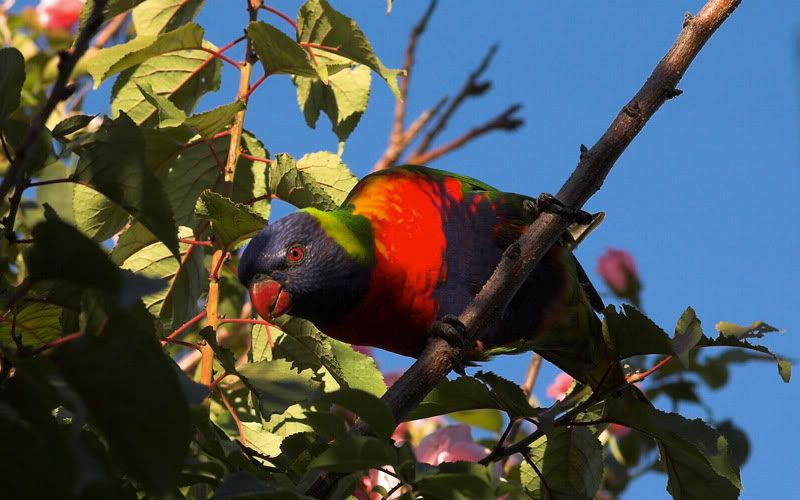
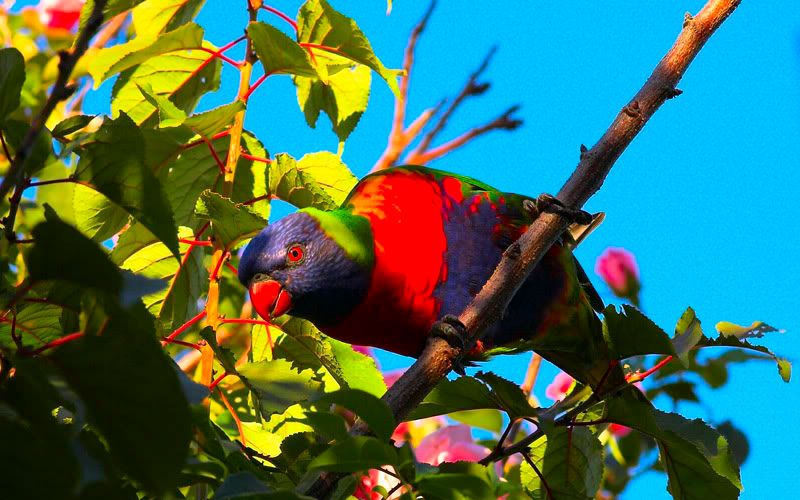
I just tried it, the only thing I did different is that I used "screen" instead of "normal" in the last step (fade) and converted back to RGB at the end to be able to save as jpeg.
Here's the result.
Original
Enhansed
 __________
Phillip
**Nikon D7000**
-

phillipb
- Senior Member
-
- Posts: 2599
- Joined: Sat Aug 07, 2004 10:56 am
- Location: Milperra (Sydney) **Nikon D7000**
 by NikonUser on Wed May 17, 2006 9:33 pm by NikonUser on Wed May 17, 2006 9:33 pm
gstark wrote:birddog114 wrote:Do we still need the workshop if this rate of tutorial going up high?
I would say yes. There is nothing that can equal a hands on session, especially with somebidy as good as Matt K leading the troops.
But for those of us who can't make it to those hands on sessions... please post heaps of easy to follow tutorials 
-

NikonUser
- Senior Member
-
- Posts: 1064
- Joined: Tue Jul 12, 2005 6:18 pm
- Location: Canberra - **D2X**
-
 by NikonUser on Wed May 17, 2006 10:40 pm by NikonUser on Wed May 17, 2006 10:40 pm
phillipb wrote:Thanks Paul,
I just tried it, the only thing I did different is that I used "screen" instead of "normal" in the last step (fade) and converted back to RGB at the end to be able to save as jpeg.
Here's the result.
Original
Enhansed
Apart from the massivly blown red channel I like it!
Here's another example. I just ran it on a few images and it seems to work quite well on a lot of landscapes.

-

NikonUser
- Senior Member
-
- Posts: 1064
- Joined: Tue Jul 12, 2005 6:18 pm
- Location: Canberra - **D2X**
-
 by Matt. K on Wed May 17, 2006 11:17 pm by Matt. K on Wed May 17, 2006 11:17 pm
Thanks Paul
Here's another way to achieve a similar result. Just set the USM parameters as shown here and EDIT/FADE UNSHARPMASK to suit.
 Regards
Matt. K
-

Matt. K
- Former Outstanding Member Of The Year and KM
-
- Posts: 9981
- Joined: Mon Sep 06, 2004 7:12 pm
- Location: North Nowra
 by radar on Wed May 17, 2006 11:25 pm by radar on Wed May 17, 2006 11:25 pm
Great tips,
thanks guys, now I'll just "translate" it to bibble/gimp. 
André Photography, as a powerful medium of expression and communications, offers an infinite variety of perception, interpretation and execution. Ansel Adams
(misc Nikon stuff)
-

radar
- Senior Member
-
- Posts: 2823
- Joined: Mon Jun 13, 2005 11:18 am
- Location: Lake Macquarie (Newcastle) - D700, D7000
-
 by leek on Wed May 17, 2006 11:39 pm by leek on Wed May 17, 2006 11:39 pm
phillipb wrote:Thanks Paul,
I just tried it, the only thing I did different is that I used "screen" instead of "normal" in the last step (fade) and converted back to RGB at the end to be able to save as jpeg.
Philip, Sorry to say that while the method seems to work for the original landscape, your enhanced photo doesn't look very natural... IMHO The colours of the bird look far better in your original image... While the background leaves could do with a POP, this could probably have been achieved with a slight modification to the curve...
-

leek
- Senior Member
-
- Posts: 3135
- Joined: Thu Dec 23, 2004 4:46 pm
- Location: Lane Cove, Sydney
-
 by Steffen on Thu May 18, 2006 2:03 am by Steffen on Thu May 18, 2006 2:03 am
radar wrote:thanks guys, now I'll just "translate" it to bibble/gimp.
André, bibble can't do this sort of stuff, after all, it's not an image editor but a RAW converter. It doesn't support decomposing into LAB (or anything else for that matter).
The GIMP does however, and channel manipulations in LAB mode work just like in PS. I'm not quite sure what they mean with "fade" in PS speak, though.
Cheers
Steffen.
-

Steffen
- Senior Member
-
- Posts: 1931
- Joined: Mon Oct 31, 2005 4:52 pm
- Location: Toongabbie, NSW
 by beetleboy on Thu May 18, 2006 3:07 am by beetleboy on Thu May 18, 2006 3:07 am
Trust MattK to come out with the classic "Reverse USM" - nice one!
The master, pulling the classic moves!
Liam =]
-

beetleboy
- Senior Member
-
- Posts: 821
- Joined: Fri Sep 17, 2004 4:57 am
- Location: Highbury, Adelaide
-
Return to Post Processing
|


