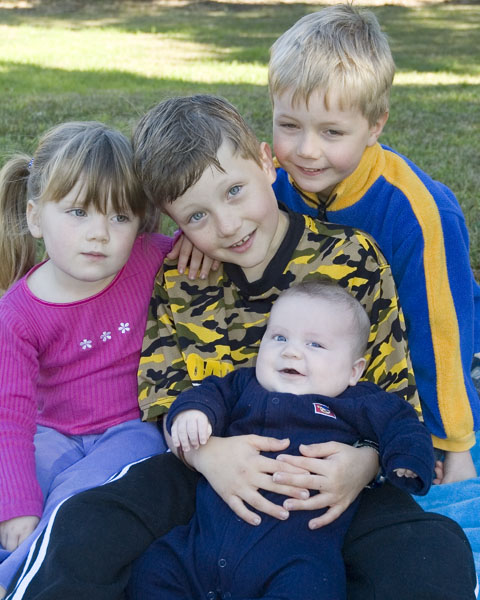
Can I fix this? Is it doable.
The image is shot in RAW if that is of any help.
Cheers
Deb
Can you help fix this image? Warning...kids involvedModerators: Greg B, Nnnnsic, Geoff, Glen, gstark, Moderators
Forum rules
Please note that image critiquing is a matter of give and take: if you post images for critique, and you then expect to receive criticism, then it is also reasonable, fair and appropriate that, in return, you post your critique of the images of other members here as a matter of courtesy. So please do offer your critique of the images of others; your opinion is important, and will help everyone here enjoy their visit to far greater extent. Also please note that, unless you state something to the contrary, other members might attempt to repost your image with their own post processing applied. We see this as an acceptable form of critique, but should you prefer that others not modify your work, this is perfectly ok, and you should state this, either within your post, or within your signature. Images posted here should conform with the general forum guidelines. Image sizes should not exceed 950 pixels along the largest side (height or width) and typically no more than four images per post or thread. Please also ensure that you have a meaningful location included in your profile. Please refer to the FAQ for details of what "meaningful" is.
Previous topic • Next topic
23 posts
• Page 1 of 1
Can you help fix this image? Warning...kids involvedI took this photo of the kids this morning, and would like to print it, but the sunny patch in the background is really, really annoying me.

Can I fix this? Is it doable. The image is shot in RAW if that is of any help. Cheers Deb "Sometimes when you are sad Poko, it's good to hug the monkey."
try a feathered selection of the bright area then burn in a stop or so of light, you could also try bring up some saturation for the kids.
Life's pretty straight without drifting
http://www.puredrift.com
Redline, thanks.
The kids (well the whole image) is actually richer in colour on my monitor, they always lighten up when I post on the web. Cheers Deb "Sometimes when you are sad Poko, it's good to hug the monkey."

Quick job, quick step by step: 1. Masking, in this case I used twice ''color range selection with indication on the middle and edge of bright grass. Filling new layer with darker green (taken out of photo) and then playing with multiply mode set up brightness. Then you can change hue to match a tone or use one more layer with color mode. Also it could be good to have one more, greyscale leyer in multiply mode with high contrast to bring back texture (I havent done it here) Dont forget to cut green colour popping up on children bodies. I have forgoten do it on their hands 2. Then masking edges, grab a piece of grass beside, drop over and with sofr eraser cut its edges so it blends easly. You can see, I have done some parts (right from boy's head) other partly or not at all, to show effect. 3. Once it is done, apply warmth filter. Or do it in RAW procesing software before. 4. Play a bit with curves (just a bit) and then apply a touch of saturation. 5. Slight sharpenig also will help, especially if you will mask only children. 6. Dont forget to convert to srg space if you want to publish it on the web Regards, K.Polak
Deb,
You could clone it out altogether. I only had a small patch of suitable grass to use so it didn't come out all that flash  If I'm alone in a forest and my wife is not around to hear what I say, am I still wrong ??
Fantastic, thanks everyone.
This is my attempt while I was waiting for some replies 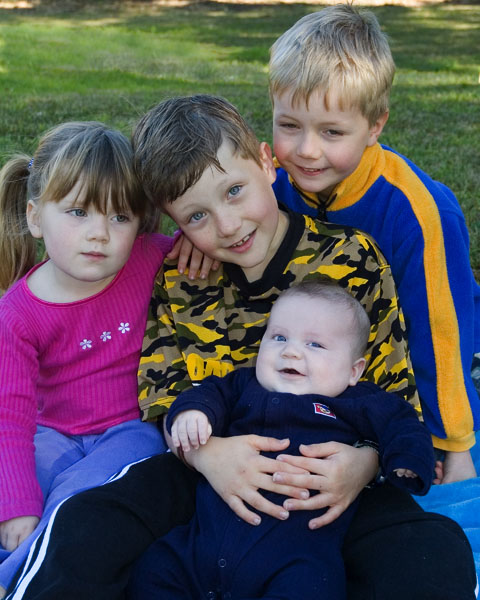
Does this work for everyone? Krpolak, thanks for the detailed instructions, I will study them in depth. And John, I didn't even think about cloning from the uncropped version....duh! Deb "Sometimes when you are sad Poko, it's good to hug the monkey."
Looks good
I'd be inclined to maybe selectively blur the background a bit just to hide the clone job a bit more and to bring the subjects out a bit more. Also the skin tones look a bit cool to me, perhaps make the white balance a bit warmer? Personal preference I guess. Excellent shot and cute kids Stephen
Yes Frink, after seeing Krpolaks version I realise the image is a little cool, will play with that a bit more.
And thanks for the comments on the kids, pity I couldn't get them all to smile and look at me at the same time! I actually tweaked the corners of my daughters mouth a little, as she really had an unhappy look on her head. Cheers Deb "Sometimes when you are sad Poko, it's good to hug the monkey."
Hi Deb
good to see you got out there and took some photos today of the kids Here is my little effort, going from your 2nd posted image, with the highlights cloned out: 
I masked the kids and then used the Filter | Blur | Lens Blur, to throw the background more OOF. Using the mask, there are infinite possibilites (putting another background behind the kids, changing the background to B&W, etc...) Keep on experimenting Dave
Nikon D7000 | 18-105 VR Lens | Nikon 50 1.8G | Sigma 70-300 APO II Super Macro | Tokina 11-16 AT-X | Nikon SB-800 | Lowepro Mini Trekker AWII Photography = Compromise
I like yours Aussie Dave, except the hands look a bit sick...
I decided I'd try this and cloned out the highlights and gave it a nice sepia-toned treatment, mostly because I prefer monochromatic images to colour ones...  Producer & Editor @ GadgetGuy.com.au
Contributor for fine magazines such as PC Authority and Popular Science.
Thanks for everyones input, enjoyed them all and learned heaps along the way.
Here is my latest version, original reposted for easy comparison. Comments welcomed.  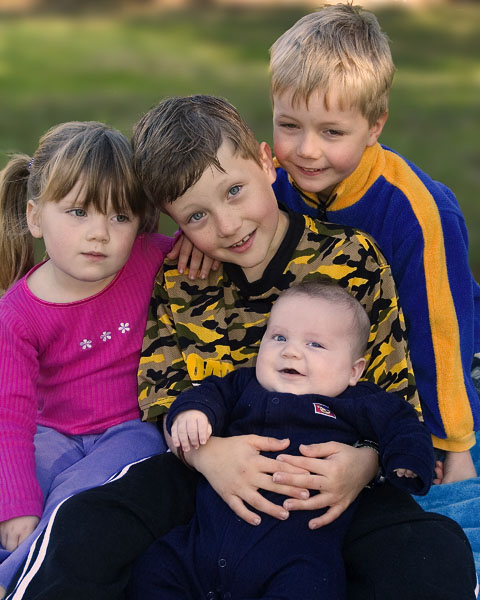
Deb "Sometimes when you are sad Poko, it's good to hug the monkey."
.........deb, looks like a keeper to me......well done.....
Cheers ....bp....
Difference between a good street photographer and a great street photographer.... Removing objects that do not belong... happy for the comments, but .....Please DO NOT edit my image..... http://bigpix.smugmug.com Forever changing
That new one is excellent.
The only thing I'd change would be to maybe go back to the Raw file (if you have it) and return a bit of that detail in the youngest one's clothing. Producer & Editor @ GadgetGuy.com.au
Contributor for fine magazines such as PC Authority and Popular Science.
Here's my attempt at correcting the background problem.
In your last post I really like the skin tones correction. Much more natural than the bluish pale cast of the first. I've worked on your original image and I haven't done any colour correction to the kids. All I've tried to do is to make the grassy background realistic without the intense light coming in from the side. Combination of the selection tool and the clone tool. Nothing fancy. In your last image I agree with leighs comment about the baby's clothes but I also think that the backgound looks artifically blurred rather than gradual blurring one expects as the depth increases. Just MO though 
shakey
Shakey
great job, I used the clone tool as well, but yours is so much neater than mine was. Will play with Owen's (the baby) clothes and agree the bluring may be a bit too much, but it will do for me. And Ray, I forgot to ask how you fixed up the image. It's great to see how different people attack problems. thanks Deb "Sometimes when you are sad Poko, it's good to hug the monkey."
I used the clone stamp to get rid of the high light of the sun, then used the patch tool to blend it all together to give it a more believable look. Nothing fancy at all Cheers Ray:P >> All of us could take a lesson from the weather. It pays no attention to criticism<<
Hi Ray
Thanks, I didn't use the patch tool to blend it together, will remember that little trick for next time.
Nothing fancy about me either Ray, keeping it as simple as I can. Deb "Sometimes when you are sad Poko, it's good to hug the monkey."
Sorry I forgot to add, I used the lens blur filter to throw the back ground out a little as well.
The patch tool is a good one to get to know, it can save the day when all ells fails. Cheers Ray >> All of us could take a lesson from the weather. It pays no attention to criticism<<
Previous topic • Next topic
23 posts
• Page 1 of 1
|