|
Tutorials, questions, demos, questionable images ,,,
Moderator: Moderators
Forum rules
Please ensure that you have a meaningful location included in your profile. Please refer to the FAQ for details of what "meaningful" is.
 by stubbsy on Fri Aug 24, 2007 11:26 pm by stubbsy on Fri Aug 24, 2007 11:26 pm
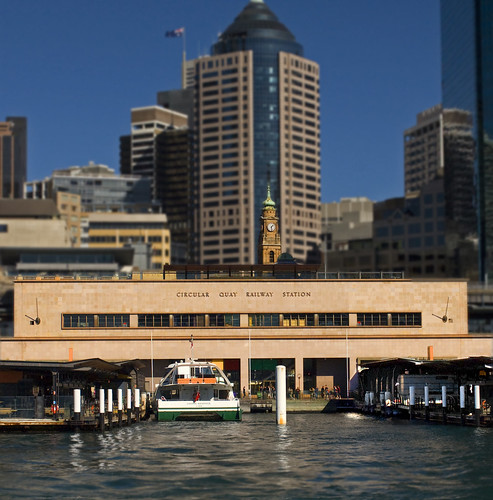
I've had some PMs back and forth with Andrew (ATJ) following THIS post by him. I suggested he might like to pick one of my PP'd shots he felt had WOW factor and have an attempt at PPing it himself. Then I'd describe what I did to produce my version of the shot. Rather than restrict this just to Andrew I figured you could all have a go if you like. After all there are many ways to crack this nut.
HERE is a link to a zipped version of my out of camera NEF (12mb). Alternatively HERE is a high quality jpeg version if your PP software can't read D2x NEFs. Go ahead and download it and PP to your hearts content. Remember there is no right or wrong result and your final product may be quite different to mine. Next Wednesday I'll show you my PP version (although it's actually available already if you really poke around) and I'll discuss what I did. Feel free to post your attempts below along with what you did. PS I know this is a lot lot like what Owen did last Sunday night (cheers Owen) and could also fit into what we mods are running one Sunday a month, but hey - it's coincidence 
EDIT: Fixed the link - now the download will actually work
EDIT: Added a second link to a jpeg version Last edited by stubbsy on Sat Aug 25, 2007 2:42 pm, edited 3 times in total.
-

stubbsy
- Moderator
-
- Posts: 10748
- Joined: Wed Dec 08, 2004 7:44 pm
- Location: Newcastle NSW - D700
-
by macka on Fri Aug 24, 2007 11:30 pm
The link is not working for me, Peter.
Cheers,
macka
a.k.a. Kris
-

macka
- Senior Member
-
- Posts: 1092
- Joined: Sat Dec 31, 2005 4:18 pm
- Location: North Rocks, Sydney
-
by Underload on Fri Aug 24, 2007 11:30 pm
Great idea for a thread  But, the link doesn't seem to work  D200 + stuff
-

Underload
- Member
-
- Posts: 197
- Joined: Sat Aug 26, 2006 12:32 am
- Location: Brisbane Northside
by stubbsy on Sat Aug 25, 2007 12:55 pm
OK The link is now working. I've hosted it at an external file hosting site.
Please go ahead and have a play. As I say above, post your results and your methods below.
-
stubbsy
- Moderator
-
- Posts: 10748
- Joined: Wed Dec 08, 2004 7:44 pm
- Location: Newcastle NSW - D700
-
by Alpha_7 on Sat Aug 25, 2007 1:22 pm
Here is my quick play with the image.

Changed WB to Cloudy on importing to CS3(everything else left to default)
Used Ctr+1, +2 and +3 to quickly view RGB channels in B&W, I prefered the blue.
Make New Adjustment layer Channel Mixer
Blue Channel - Select Monochrome
Tweaked settings till I got the below (should add up to 100 but mine was a fair bit over)
Red +38
Blue +54
Green + 33
Constant -9
New Adjustment Layer Curves
Apply Linear Contrast (Preset)
3 by 2 Crop wanted a closer crop that negated the missing top of the centre tower.
Resize to 800x Y and Sharpen.
-

Alpha_7
- Senior Member
-
- Posts: 7259
- Joined: Sun Aug 14, 2005 6:19 pm
- Location: Mortdale - Sydney - Nikon D700, x-D200, Leica, G9
-
by ATJ on Sat Aug 25, 2007 1:44 pm
Great. I'll have a go at this after I finish my chores.
I did try to load the NEF into PSP 9 and it won't load. This does not augur well for the D300.  I'm going to have to change my PPing.
-

ATJ
- Senior Member
-
- Posts: 3982
- Joined: Fri Feb 18, 2005 10:44 am
- Location: Blue Mountains, NSW
-
by stubbsy on Sat Aug 25, 2007 2:43 pm
ATJ wrote:I did try to load the NEF into PSP 9 and it won't load. This does not augur well for the D300. I'm going to have to change my PPing.
I've added a second link to a high quality jpeg version in the first post.
-
stubbsy
- Moderator
-
- Posts: 10748
- Joined: Wed Dec 08, 2004 7:44 pm
- Location: Newcastle NSW - D700
-
by ATJ on Sat Aug 25, 2007 3:08 pm
stubbsy wrote:ATJ wrote:I did try to load the NEF into PSP 9 and it won't load. This does not augur well for the D300. I'm going to have to change my PPing.
I've added a second link to a high quality jpeg version in the first post.
Thanks. I have RawShooter, so I can process it. I will just have to do different pre-post processing. 
-
ATJ
- Senior Member
-
- Posts: 3982
- Joined: Fri Feb 18, 2005 10:44 am
- Location: Blue Mountains, NSW
-
by big pix on Sat Aug 25, 2007 3:19 pm

open in NX upoint to open up shadow areas, d-lighting overall save as tiff
open in PSCS2 straighten, used curves to add a tad more punch, unsharp mask, convert to srgb, add a bit of saturation as image went flat with conversion, upload and post...... Cheers ....bp.... Difference between a good street photographer and a great street photographer.... Removing objects that do not belong... happy for the comments, but .....Please DO NOT edit my image..... http://bigpix.smugmug.com Forever changing
-

big pix
- Senior Member
-
- Posts: 4513
- Joined: Thu Feb 17, 2005 11:52 pm
- Location: Lake Macquarie NSW.
by big pix on Sat Aug 25, 2007 3:42 pm
Peter, in your metadata I noticed that you have your camera set to
exposure bias to -1,
light source set to cloudy day,
grain control set to 1
sharpness set to normal,
file size set set to 11.79mb
the file size I get with the D2Xs out of camera is 19.5mb with no compression and when converted to tiff file size jumps to 35mb plus.
I guess I am wondering if you are shooting with compression turned on, and if there is any great advantage of sharpness set to normal..... I have been using medium low......
Cheers ....bp.... Difference between a good street photographer and a great street photographer.... Removing objects that do not belong... happy for the comments, but .....Please DO NOT edit my image..... http://bigpix.smugmug.com Forever changing
-
big pix
- Senior Member
-
- Posts: 4513
- Joined: Thu Feb 17, 2005 11:52 pm
- Location: Lake Macquarie NSW.
by adam on Sat Aug 25, 2007 4:07 pm
I tried to play, even though I'm not good at PP or have any creative ideas.
Firstly, I resized it.
I drew black at the top and bottom (instead of cropping).
Use hue/saturation to change the colour.
Burn burn burn
Curves
Sharpen a bit.
Save.
 ---
Equipment: camera body, wide lens, standard lens, telephoto lens, flash
Wish list: skill
-

adam
- Senior Member
-
- Posts: 633
- Joined: Sat Aug 19, 2006 5:27 pm
- Location: New Caledonia
-
by macka on Sat Aug 25, 2007 4:25 pm
Peter, can I ask why did you shoot this at iso400?
Cheers,
macka
a.k.a. Kris
-
macka
- Senior Member
-
- Posts: 1092
- Joined: Sat Dec 31, 2005 4:18 pm
- Location: North Rocks, Sydney
-
by stubbsy on Sat Aug 25, 2007 5:11 pm
This is fun. It's interesting to see what others are doing.
Bernie - I shoot compressed NEFs as you suspect. I did some testing early on and could find no quality difference between that and the uncompressed (and much larger) version. As for WB I have cloudy -1 as my default since I find that works best from trial and error. The grain and sharpness I've not really played with since they don't affect the NEF
Kris. ISO 400 = Stupid Pierre Earlier I was using 400 where light was lower to get the shutter speed I wanted and I didn't turn it back 
-
stubbsy
- Moderator
-
- Posts: 10748
- Joined: Wed Dec 08, 2004 7:44 pm
- Location: Newcastle NSW - D700
-
by gstark on Sat Aug 25, 2007 5:18 pm
stubbsy wrote:from trial and error.
My default shooting modes. Kris. ISO 400 = Stupid Pierre Earlier I was using 400 where light was lower to get the shutter speed I wanted and I didn't turn it back
There needs to be a global "Apply my basic defaults" button on these cameras, whereby you can define a basic parameter set that you want to use as a starting point for any photographic task. These would be settable via the menus, and a function button press would recall them at your whim.
Any changes that you make while shooting would apply in real time, but would not affect your default setup. Thus, when you next need to reset your camera to your default starting setup, it's always there for you. g.
Gary Stark
Nikon, Canon, Bronica .... stuff
The people who want English to be the official language of the United States are uncomfortable with their leaders being fluent in it - US Pres. Bartlet
-

gstark
- Site Admin
-
- Posts: 22926
- Joined: Thu Aug 05, 2004 11:41 pm
- Location: Bondi, NSW
by dviv on Sat Aug 25, 2007 6:07 pm
I think the 40D has something like you are describing Gary,
In the youtube video that was posted earlier, the Canon guy said you can set up "shortcuts" like Tv and Av, but with your own settings.
-

dviv
- Senior Member
-
- Posts: 1085
- Joined: Tue Oct 10, 2006 8:50 am
- Location: North Shore, Sydney
by ATJ on Sat Aug 25, 2007 6:08 pm

Opened in RawShooter essentials 2006
Colour temperature: 5050K
Exposure compensation: 0.30
Shadow contrast: 20
Highlight contrast: 40
Save to tif and opened in Paint Shop Pro 9
Reszie to 800x532
Unsharp mask: 1.00 60 10
Added copyright text to image and EXIF
Saved as JPEG
-
ATJ
- Senior Member
-
- Posts: 3982
- Joined: Fri Feb 18, 2005 10:44 am
- Location: Blue Mountains, NSW
-
by ATJ on Sat Aug 25, 2007 6:10 pm
gstark wrote:Kris. ISO 400 = Stupid Pierre Earlier I was using 400 where light was lower to get the shutter speed I wanted and I didn't turn it back
There needs to be a global "Apply my basic defaults" button on these cameras, whereby you can define a basic parameter set that you want to use as a starting point for any photographic task. These would be settable via the menus, and a function button press would recall them at your whim. Any changes that you make while shooting would apply in real time, but would not affect your default setup. Thus, when you next need to reset your camera to your default starting setup, it's always there for you.
I have the same problem and I need that feature. I shot the whole day with my WB set to Flash +3, which is what I use for underwater.
-
ATJ
- Senior Member
-
- Posts: 3982
- Joined: Fri Feb 18, 2005 10:44 am
- Location: Blue Mountains, NSW
-
by firsty on Sun Aug 26, 2007 12:12 am
one of many options available with this image

edited with lightroom
cropped for the ferry as point of interest
warmed up color temp to 6500 and lowered tint to 0
highlight recovery +50
fill light +10
blacks +5
brightness +25
contrast +25
clarity +40
vibrance +30
saturation =no change
tone curve medium contrast
highlights -25
lights -10
darks -5
shadows = no change
HSL adjustments
hue no changes
saturation = orange +40, yellow +45, aqua +3, blue +10
luminance = orange -20, yellow -40. green -10, blue -13
luminance noise reduction = 30
sharpening amount =70, radius =1.1, detail =25, masking =15
added vignetting to right side to bring your eyes back to the ferry and not off to that side
exported as final sized jpeg
opened in CS2
burned left hand side a little to bring focus the the ferry
dodge around the ferry and the water in front for same reason
dodged the shadows in the wharfs to bring out a little detail
light final sharpen
change profile for web viewing
save for web with max size 200kb
my overall editing was to pick a point of interest (around the ferry) and highlight that by drawing your eyes to it with light and color Last edited by firsty on Sun Aug 26, 2007 12:24 am, edited 1 time in total.
-

firsty
- Senior Member
-
- Posts: 581
- Joined: Tue Jan 10, 2006 12:34 am
- Location: Baulkham Hills Sydney - D200
by firsty on Sun Aug 26, 2007 12:22 am
very quick second option

-
firsty
- Senior Member
-
- Posts: 581
- Joined: Tue Jan 10, 2006 12:34 am
- Location: Baulkham Hills Sydney - D200
by Steffen on Sun Aug 26, 2007 5:11 am
My edit:

My usual play in Aperture, cropping, contrast, monochrome mixer, tint...
Cheers
Steffen. lust for comfort suffocates the soul
-

Steffen
- Senior Member
-
- Posts: 1931
- Joined: Mon Oct 31, 2005 4:52 pm
- Location: Toongabbie, NSW
by stubbsy on Fri Aug 31, 2007 8:11 pm
Well it's been a busy week so I'm 2 days late getting to this. Here is my PP'd version of the image along with the un pp'd (but resized) original:
 ... 
And HERE is a Photoshop CS3 action which records my steps. You can downalod this and replay it in photoshop to see the steps in more detail. This is a brief summary of what I did
- used ruler tool to align a straight edge then rotate canvas to level horizon
- Edit/Transform/Perspective and dragged out top corners to straighten perspective
- slight crop to remove edges from rotate where there was no image
- Image/Adjustments/Auto Levels
- Image/Adjustments/Exposure - increased exposure slightly (I typically underexpose my shots when taken since I obsess about blown highlights)
- Image/Adjustments/Shadow/Highlight - 9% to bring up shadows
- Image/Adjustments/Curves - linear contrast (this is a new CS3 setting - it's a very shallow S curve)
- Image/Adjustments Colour Balance - tweaked the image to push the blues and cyans up a touch and remove the slight orange/yellow colour cast
- Image/adjustments/Photo filter - added a warming filter at 20% to warm the image slightly to compensate for my colour correction
- Image/Adjustments/Hue/Saturation to bump saturation by 20%
- Image resize to 1200 wide ready for web
- Image Smart Sharpen
- Convert to 8 bits
- Convert colour profile to sRGB for web (I shoot on AdobeRGB)
I must say looking at the various takes on this image here is a great example of how different people see different things in a shot and how the way an image is post processed can really change what the end result is like for the viewer.
I have found this quite an interesting exercise and hope that you have too.
-
stubbsy
- Moderator
-
- Posts: 10748
- Joined: Wed Dec 08, 2004 7:44 pm
- Location: Newcastle NSW - D700
-
by Heath Bennett on Wed Sep 26, 2007 10:15 pm
gstark wrote:There needs to be a global "Apply my basic defaults" button on these cameras
I've never used it, but what about the two green button hold - similar to the two red button format, on the D2x? HB
-

Heath Bennett
- Senior Member
-
- Posts: 1351
- Joined: Fri Jun 17, 2005 8:49 pm
- Location: Morisset/Bonnells Bay
by gstark on Thu Sep 27, 2007 2:24 am
Heath Bennett wrote:gstark wrote:There needs to be a global "Apply my basic defaults" button on these cameras
I've never used it, but what about the two green button hold - similar to the two red button format, on the D2x?
Heath,
Dunno, but I expect that's probably resetting back to factory defaults, rather than the ones that you (or I) might prefer.
What I'm saying is that I'd like to program in my basic setup, and have that selectable in some way. Then, whenever I go on a shoot, I can easily have the camera set back to my personal starting point. Very handy if you lend your camera to someone, and they then change the settings to how they want to use your camera. g.
Gary Stark
Nikon, Canon, Bronica .... stuff
The people who want English to be the official language of the United States are uncomfortable with their leaders being fluent in it - US Pres. Bartlet
-
gstark
- Site Admin
-
- Posts: 22926
- Joined: Thu Aug 05, 2004 11:41 pm
- Location: Bondi, NSW
by Heath Bennett on Thu Sep 27, 2007 8:20 am
It would be good if it was programmable - I do think that the green button thing doesn't effect custom settings, but rather things like ISO, WB... actually, here is something from everyone's favourite poet, Ken Rockwell:
"CAMERA SETTINGS
I leave most settings at their defaults.
I reset everything every time I use my camera, much as a pilot uses a checklist before flight to prevent any switches from being in the wrong position. When I don't check first, I often have left my D200 in some screwy mode from shooting in the dark the night before.
Nikon has an easy reset feature. I use it every time! My standard operating setting only is one click different than the defaults, and that's only because I use one trick I'll explain in the menus to improve image file size.
RESET: Find the * QUAL and +/- * buttons on the top of the camera. Hold them both down for a few seconds. The top LCD blinks and everything is back to normal.
I do this every time I use my D200. If I forget, I may have the resolution or White Balance or ISO or God knows what set to something screwy and spoil all my shots. I'll see WB problems on the LCD, but I won't notice if I left my D200 at ISO 1,600 from the night before. That's why I always use reset.
Reset leaves the detailed menu tweaks alone and is smart enough to reset only the big dumb things I might have moved overnight.
QUALity: Large, JPG, BASIC, Optimal Quality Mode
Reset brings you to NORMAL JPG. Once I've reset I'll immediately change to my preferred QUAL setting: BASIC. Do this by pressing the QUAL button and spinning the rear dial one click to the right. This shows as L and BASIC on the top LCD. L stands for Large image size (3,872 x 2,592 pixels) and BASIC JPG compression.
This is the only thing I change from the reset mode. Everything else I tweak below is unchanged by reset." HB
-
Heath Bennett
- Senior Member
-
- Posts: 1351
- Joined: Fri Jun 17, 2005 8:49 pm
- Location: Morisset/Bonnells Bay
by Greg B on Thu Sep 27, 2007 10:22 am
The D200 has four shooting banks.
If you set up bank A as your default,and copy it exactly to B, you can shoot using B and make any changes you like, then go back to A whan you want your default setup.
You can then copy A to B when you get home using Camera Control Pro.
Not as fiddly in practice as it is to describe.
Greg - - - - D200 etc
Talent hits a target no one else can hit; Genius hits a target no one else can see.
- Arthur Schopenhauer
-

Greg B
- Moderator
-
- Posts: 5938
- Joined: Fri Sep 03, 2004 7:14 pm
- Location: Surrey Hills, Melbourne
-
by robert on Fri Sep 28, 2007 11:10 am
Thought I'd have a go, just trying to be different- I normally would have cropped and added a bit of saturation.
I have added some gaussian blur and darkened the buidlings, and lightened the right shadow and saturated the train station. (PS Elements 4)
Looking at it now think I have overdone the blur....
Robert
-

robert
- Member
-
- Posts: 378
- Joined: Wed May 30, 2007 12:16 pm
- Location: Sutherland, Sydney
by mickb on Tue Oct 16, 2007 10:50 am
I think we need to start with an image that needs more work, this image looks great the way it was, maybe just a little tweak in saturation to bring out the sandstone building, and a very small amount of shadow recovery.
Mick Brown

-
mickb
- Newbie
-
- Posts: 13
- Joined: Thu Oct 04, 2007 11:48 pm
- Location: Roxburgh Park, Melbourne
by JeffGlue on Tue Oct 16, 2007 6:48 pm
'firsty', I really like your colour/tone choices in your version...what steps did you take?
-
JeffGlue
- Member
-
- Posts: 78
- Joined: Mon Oct 01, 2007 12:04 am
- Location: Collinswood, Adelaide
Return to Post Processing
|

